I find that polyethylene vessels are cheap, light, easy to clean, easy to connect, and come in a wide range of sizes. My recommendations for vessel sizes are as follows, assuming that your brew length is 1 volume unit:
Hot liquor tank: 2 volumes
Mash tun: 0.8 volumes
Kettle: 1.5 volumes
Fermenter: 1.2 volumes
I wanted a conical fermenter, and the smallest I could find in
polyethylene was 80 liters; this determined the sizes of my other
vessels. The Wort Hog Homebrewers club invested in a mould for a
50-liter fermenter, so now homebrewers have the option of a more
reasonably sized brewery for homebrewing purposes.
Now we have a quote for this Sinvac system (Download a .pdf quote for the 4
vessels).
After trying a two-tier system, I realised the value of having easy
access to all of my vessels at the same level.
Magnetically-coupled washing machine pumps are rated to pump very hot
water, are cheap and reliable. I recommend a single-tier system
with a pump for each of the hot vessels. This gives a very
flexible system that allows the pumping of liquid in virtually brewing
situation you may find yourself in! See the pic below:

The three pumps are shown. From left to right, is the hot liquor
tank pump, the mash/lauter tun pump, and closest is the kettle
pump. The 2 taps provide hot water and wort samples
respectively. The red connector on the far end is a recycle back
to the hot liquor tank, allowing mixing of acid additions, etc. and
improving the heat transfer on the HERMS. The vertical connector
goeas to HERMS and/or mash tun recycle. The light switch switches
the pumps on. Note the brass quick-coupled garden hose
connectors. The plastic connectors tend to deform with the hot
fluids.
I would not use the same valves if I were to redo my plumbing
system. By using stopcock valves, you get a male and female thread,
which reduces the number of adapters needed. It also makes the
whole plumbing system more compact. Here is a pic of the
re-designed system:
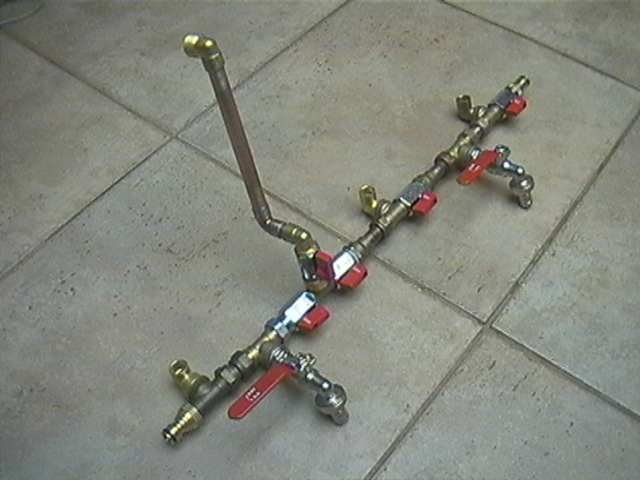
The vertical bit of piping is the mash tun recirculation, and also used
for the water during sparging. The three brass elbows are
connected to the 3 washing machine pump outlets. The inlets of these
pumps are connected to the brewing vessels. From left to right,
they will be the hot liquor tank, the mash tun and the kettle.
The quick-connect on the left goes back to the hot liquor tank, where
the recirculation helps to mix acids and salt additions, and improve
heat exchange on the herms pipes immersed in the hot liquor tank.
The right hand disconnect goes to the counterflow chiller. There
are two sample valves. The left hand valve alllows withdrawal of
hot liquor, and the right hand sample valve allows withdrawal of wort.
For the hot liquor tank, a geyser element with a thermostat (I set mine for 78°C) is sufficient. You need to fill the hot liquor tank the night before brewing, and have hot liquor for mashing in the next morning.
For the kettle, use an electrical element made of Incoloy. This expensive austenitic stainless steel is commonly used for elements, but it is necessary to minimise surface fouling, and eventually element failure on your kettle. I always thought low energy density (kW/m2) on a kettle element was important, but some colleagues with high energy density Incoloy elements have enjoyed a long life on their elements and make good beer that does not seem overly caramelised.
Here is a Powerpoint presentation (734 kb) I made to Worthog Brewers on homebrewery design in February 2003.